11.4: Laboratory Activities and Assignment
- Page ID
- 53680
\( \newcommand{\vecs}[1]{\overset { \scriptstyle \rightharpoonup} {\mathbf{#1}} } \)
\( \newcommand{\vecd}[1]{\overset{-\!-\!\rightharpoonup}{\vphantom{a}\smash {#1}}} \)
\( \newcommand{\id}{\mathrm{id}}\) \( \newcommand{\Span}{\mathrm{span}}\)
( \newcommand{\kernel}{\mathrm{null}\,}\) \( \newcommand{\range}{\mathrm{range}\,}\)
\( \newcommand{\RealPart}{\mathrm{Re}}\) \( \newcommand{\ImaginaryPart}{\mathrm{Im}}\)
\( \newcommand{\Argument}{\mathrm{Arg}}\) \( \newcommand{\norm}[1]{\| #1 \|}\)
\( \newcommand{\inner}[2]{\langle #1, #2 \rangle}\)
\( \newcommand{\Span}{\mathrm{span}}\)
\( \newcommand{\id}{\mathrm{id}}\)
\( \newcommand{\Span}{\mathrm{span}}\)
\( \newcommand{\kernel}{\mathrm{null}\,}\)
\( \newcommand{\range}{\mathrm{range}\,}\)
\( \newcommand{\RealPart}{\mathrm{Re}}\)
\( \newcommand{\ImaginaryPart}{\mathrm{Im}}\)
\( \newcommand{\Argument}{\mathrm{Arg}}\)
\( \newcommand{\norm}[1]{\| #1 \|}\)
\( \newcommand{\inner}[2]{\langle #1, #2 \rangle}\)
\( \newcommand{\Span}{\mathrm{span}}\) \( \newcommand{\AA}{\unicode[.8,0]{x212B}}\)
\( \newcommand{\vectorA}[1]{\vec{#1}} % arrow\)
\( \newcommand{\vectorAt}[1]{\vec{\text{#1}}} % arrow\)
\( \newcommand{\vectorB}[1]{\overset { \scriptstyle \rightharpoonup} {\mathbf{#1}} } \)
\( \newcommand{\vectorC}[1]{\textbf{#1}} \)
\( \newcommand{\vectorD}[1]{\overrightarrow{#1}} \)
\( \newcommand{\vectorDt}[1]{\overrightarrow{\text{#1}}} \)
\( \newcommand{\vectE}[1]{\overset{-\!-\!\rightharpoonup}{\vphantom{a}\smash{\mathbf {#1}}}} \)
\( \newcommand{\vecs}[1]{\overset { \scriptstyle \rightharpoonup} {\mathbf{#1}} } \)
\( \newcommand{\vecd}[1]{\overset{-\!-\!\rightharpoonup}{\vphantom{a}\smash {#1}}} \)
\(\newcommand{\avec}{\mathbf a}\) \(\newcommand{\bvec}{\mathbf b}\) \(\newcommand{\cvec}{\mathbf c}\) \(\newcommand{\dvec}{\mathbf d}\) \(\newcommand{\dtil}{\widetilde{\mathbf d}}\) \(\newcommand{\evec}{\mathbf e}\) \(\newcommand{\fvec}{\mathbf f}\) \(\newcommand{\nvec}{\mathbf n}\) \(\newcommand{\pvec}{\mathbf p}\) \(\newcommand{\qvec}{\mathbf q}\) \(\newcommand{\svec}{\mathbf s}\) \(\newcommand{\tvec}{\mathbf t}\) \(\newcommand{\uvec}{\mathbf u}\) \(\newcommand{\vvec}{\mathbf v}\) \(\newcommand{\wvec}{\mathbf w}\) \(\newcommand{\xvec}{\mathbf x}\) \(\newcommand{\yvec}{\mathbf y}\) \(\newcommand{\zvec}{\mathbf z}\) \(\newcommand{\rvec}{\mathbf r}\) \(\newcommand{\mvec}{\mathbf m}\) \(\newcommand{\zerovec}{\mathbf 0}\) \(\newcommand{\onevec}{\mathbf 1}\) \(\newcommand{\real}{\mathbb R}\) \(\newcommand{\twovec}[2]{\left[\begin{array}{r}#1 \\ #2 \end{array}\right]}\) \(\newcommand{\ctwovec}[2]{\left[\begin{array}{c}#1 \\ #2 \end{array}\right]}\) \(\newcommand{\threevec}[3]{\left[\begin{array}{r}#1 \\ #2 \\ #3 \end{array}\right]}\) \(\newcommand{\cthreevec}[3]{\left[\begin{array}{c}#1 \\ #2 \\ #3 \end{array}\right]}\) \(\newcommand{\fourvec}[4]{\left[\begin{array}{r}#1 \\ #2 \\ #3 \\ #4 \end{array}\right]}\) \(\newcommand{\cfourvec}[4]{\left[\begin{array}{c}#1 \\ #2 \\ #3 \\ #4 \end{array}\right]}\) \(\newcommand{\fivevec}[5]{\left[\begin{array}{r}#1 \\ #2 \\ #3 \\ #4 \\ #5 \\ \end{array}\right]}\) \(\newcommand{\cfivevec}[5]{\left[\begin{array}{c}#1 \\ #2 \\ #3 \\ #4 \\ #5 \\ \end{array}\right]}\) \(\newcommand{\mattwo}[4]{\left[\begin{array}{rr}#1 \amp #2 \\ #3 \amp #4 \\ \end{array}\right]}\) \(\newcommand{\laspan}[1]{\text{Span}\{#1\}}\) \(\newcommand{\bcal}{\cal B}\) \(\newcommand{\ccal}{\cal C}\) \(\newcommand{\scal}{\cal S}\) \(\newcommand{\wcal}{\cal W}\) \(\newcommand{\ecal}{\cal E}\) \(\newcommand{\coords}[2]{\left\{#1\right\}_{#2}}\) \(\newcommand{\gray}[1]{\color{gray}{#1}}\) \(\newcommand{\lgray}[1]{\color{lightgray}{#1}}\) \(\newcommand{\rank}{\operatorname{rank}}\) \(\newcommand{\row}{\text{Row}}\) \(\newcommand{\col}{\text{Col}}\) \(\renewcommand{\row}{\text{Row}}\) \(\newcommand{\nul}{\text{Nul}}\) \(\newcommand{\var}{\text{Var}}\) \(\newcommand{\corr}{\text{corr}}\) \(\newcommand{\len}[1]{\left|#1\right|}\) \(\newcommand{\bbar}{\overline{\bvec}}\) \(\newcommand{\bhat}{\widehat{\bvec}}\) \(\newcommand{\bperp}{\bvec^\perp}\) \(\newcommand{\xhat}{\widehat{\xvec}}\) \(\newcommand{\vhat}{\widehat{\vvec}}\) \(\newcommand{\uhat}{\widehat{\uvec}}\) \(\newcommand{\what}{\widehat{\wvec}}\) \(\newcommand{\Sighat}{\widehat{\Sigma}}\) \(\newcommand{\lt}{<}\) \(\newcommand{\gt}{>}\) \(\newcommand{\amp}{&}\) \(\definecolor{fillinmathshade}{gray}{0.9}\)Laboratory Activities and Assignment
Part 1: Review of Introduction to Skeletal Muscles
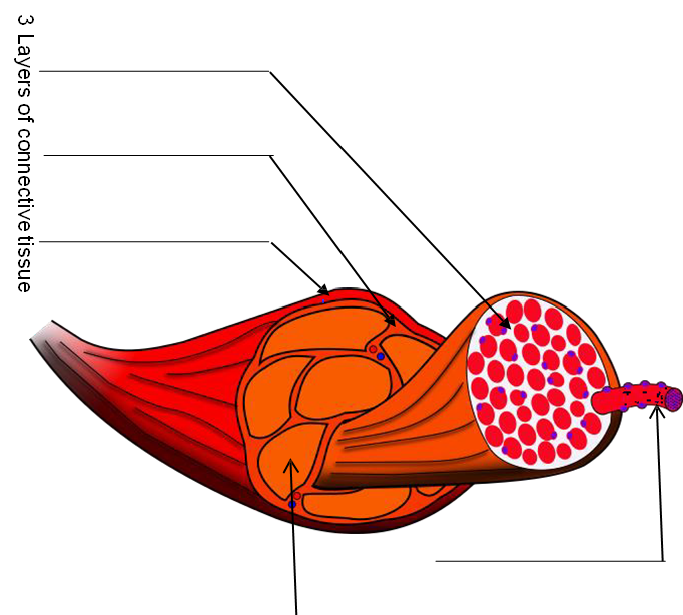
1. Label the figure showing the structure of a skeletal muscle below with the following terms:
|
|
|
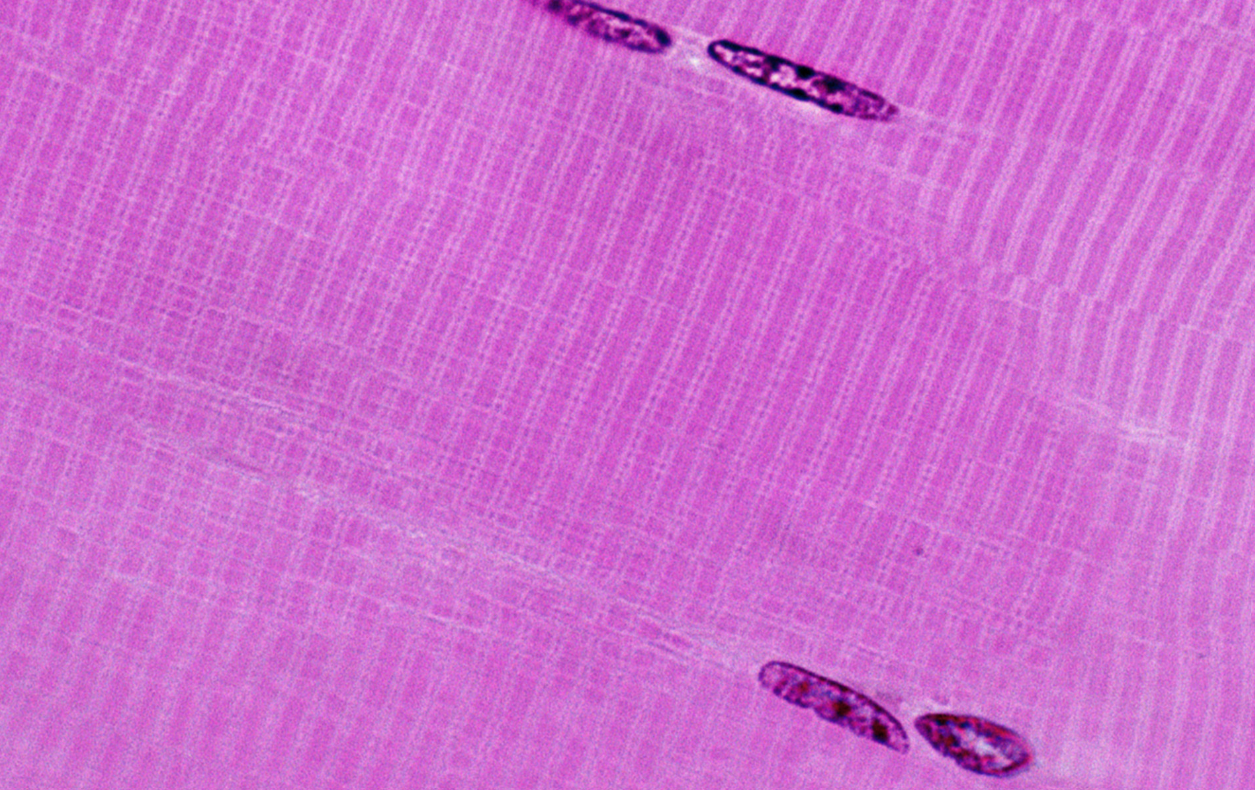
2. Below is a microscopic image of a longitudinal view of muscle fibers magnified by 1000x. Label the following structures on the image:
|
|
|
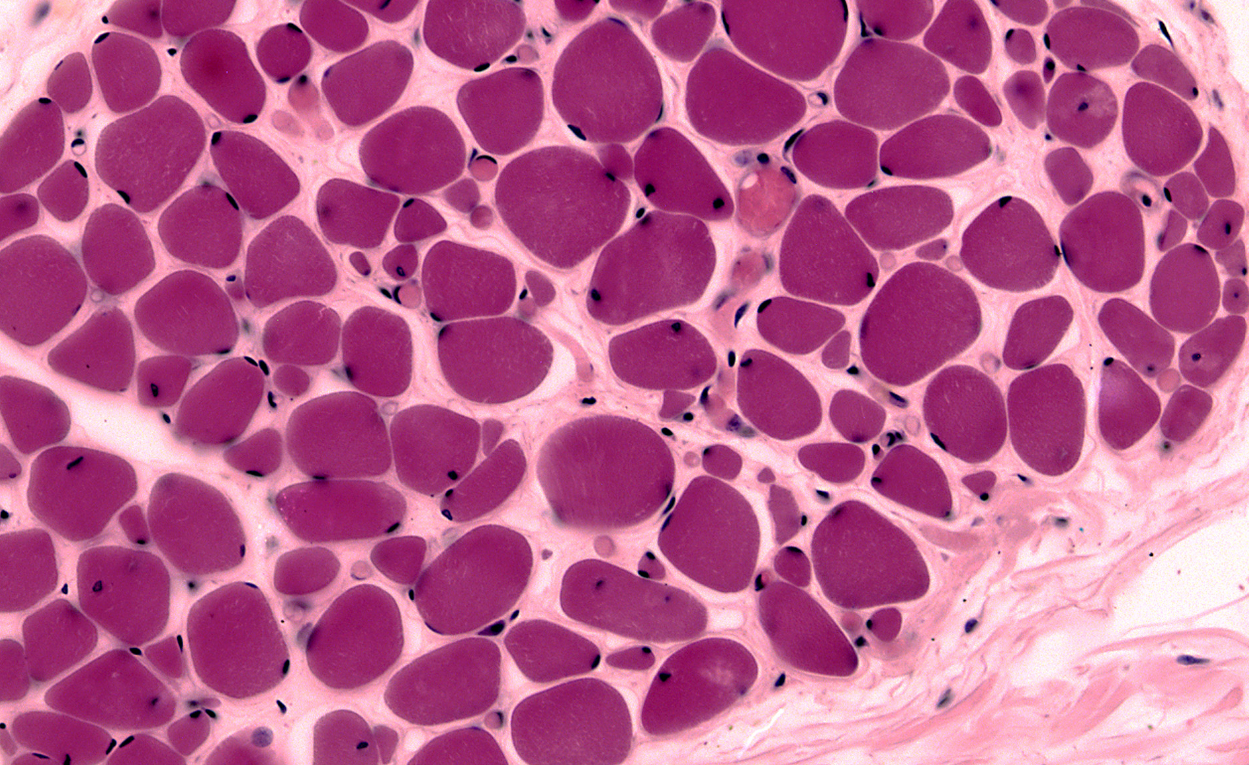
3. Below is a microscopic image of a cross section of muscle fibers magnified by 200x. Label the following structures on the image:
|
|
|
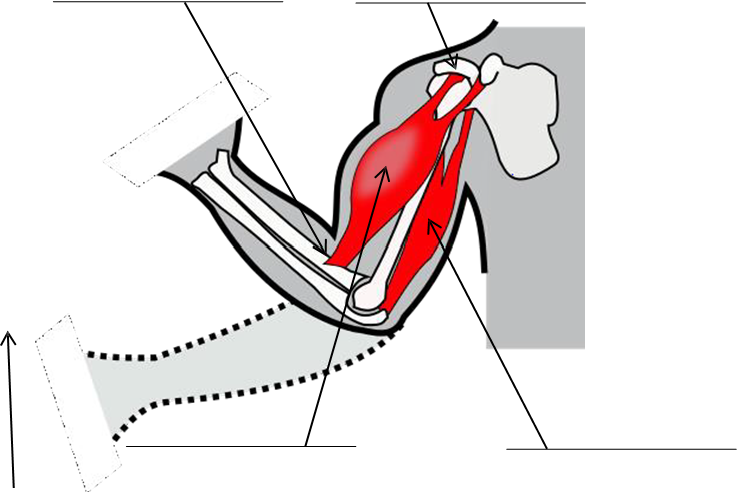
4. Label the figure showing examples of skeletal muscles below with the following terms:
|
|
|
Part 2: Introduction to Skeletal Muscles Laboratory Activities
1. Examine a slide of skeletal muscle viewing muscle fibers with a longitudinal view. Illustrate the tissue and label the following structures. Indicate the total magnification of the view you illustrate in the space provided.
- muscle fiber
- striations
- nuclei
- A band
- I band
- H zone (challenge)
- Z disc (challenge)
2. Examine a slide of skeletal muscle that has been cross-sectioned. Illustrate the tissue and label the following structures. Indicate the total magnification of the view you illustrate in the space provided.
- epimysium
- fascicle
- perimysium
- muscle fiber
- endomysium
- nuclei
3. Below is electron micrograph (very high magnification - 15,000x magnification in this image) of a longitudinal view of multiple myofibrils (structures found inside of a single muscle fiber) stacked top to bottom and their component sarcomeres lined up (left to right). Work with your group to label the following structures:
|
|
|
4. Examine the following images of the some examples of skeletal muscles. If possible, identify these muscles on anatomical models available to you. Discuss with your group the shapes and fascicle arrangements of each of these muscles. Match each of these muscles with its shape/fascicle arrangement description from the choices given:
_____ circular _____ convergent _____ parallel fusiform |
_____ parallel non-fusiform _____ unipennate |
_____ bipennate _____ multipennate |
5. Below is a list of muscles (continued on the next page). Discuss each muscle name with your group and match with the following descriptions based on the name of the muscle.
_____ supraspinatus _____ trapezius _____ flexor carpi ulnaris _____ triceps brachii _____ adductor magnus _____ vastus lateralis _____ extensor digitorum longus _____biceps femoris _____ pronator teres _____ rectus abdominis _____ tibialis posterior _____ gluteus minimus _____ extensor carpi radialis brevis _____ rhomboid major _____ sternohyoid |
A. Causes pronation of the forearm B. A two-headed muscle located along the femur C. Causes extension of the digits, a long muscle D. Causes flexion, origin includes the ulna, insertion includes carpal bones E. A straight shaped muscle located abdominally F. Has a shape similar to a trapezoid G. A small muscle located at the gluteal (butt) region H. Causes adduction of the thigh I. A rhombus-shaped muscle that is larger than another rhombus-shaped muscle J. Located on the posterior aspect of the tibia K. Located in the supraspinous fossa of the scapula L. Has an origin at the sternum and inserts on the hyoid M. A large muscle located laterally N. Causes extension of the wrist, located along the radius O. A three-headed muscle along the brachium (arm) |
Attributions
Part 1: Review of Introduction to Skeletal Muscles
- "Anatomy and Physiology Lab Homework" by Laird C Sheldahl is licensed under CC BY-SA 4.0
- "Digital Histology" by Department of Anatomy and Neurobiology and the Office of Faculty Affairs, Virginia Commonwealth University School of Medicine and the ALT Lab at Virginia Commonwealth University is licensed under CC BY 4.0
Part 2: Introduction to Skeletal Muscles Laboratory Activities
- "BIOL 250 Human Anatomy Lab Manual SU 19" by Yancy Aquino, Skyline College is licensed under CC BY-NC-SA 4.0
- "BodyParts3D/Anatomography" by The Database Center for Life Science is licensed under CC BY-SA 2.1
- "Digital Histology" by Department of Anatomy and Neurobiology and the Office of Faculty Affairs, Virginia Commonwealth University School of Medicine and the ALT Lab at Virginia Commonwealth University is licensed under CC BY 4.0