
3.1: Introduction to the Microscope
- Page ID
- 52269
Learning Outcomes
- Review the principles of light microscopy and identify the major parts of the microscope.
- Learn how to use the microscope to view slides of several different cell types, including the use of the oil immersion lens to view bacterial cells.
Early Microscopy
The first microscope was developed in 1590 by Dutch lens grinders Hans and Zacharias Jansen. In 1667, Robert Hooke described the microscopic appearance of cork and used the term cell to describe the compartments he observed. Anton van Leeuwenhoek was the first person to observe living cells under the microscope in 1675—he described many types of cells, including bacteria. Since then more sophisticated and powerful scopes have been developed that allow for higher magnification and clearer images.
Microscopy is used by scientists and health care professionals for many purposes, including diagnosis of infectious diseases, identification of microorganisms (microscopic organisms) in environmental samples (including food and water), and determination of the effect of pathogenic (disease-causing) microbes on human cells. This exercise will familiarize you with the microscopes we will be using to look at various types of microorganisms throughout the semester.
The Light Microscope
What does it mean to be microscopic? Objects are said to be microscopic when they are too small to be seen with the unaided eye—they need to be magnified (enlarged) for the human eye to be able to see them. This includes human cells and many other types of cells that you will be studying in this class. The microscope you will be using uses visible light and two sets of lenses to produce a magnified image. The total magnification will depend on which objective lens you are using—the highest magnification possible on these microscopes is typically 1000X—meaning that objects appear 1000X larger than they actually are.
Resolution vs. Magnification
Magnification refers to the process of making an object appear larger than it is; whereas resolution is the ability to see objects clearly enough to tell two distinct objects apart. Although it is possible to magnify above 1000X, a higher magnification would result in a blurry image. (Think about magnifying a digital photograph beyond the point where you can see the image clearly). This is due to the limitations of visible light (details that are smaller than the wavelength of light used cannot be resolved).
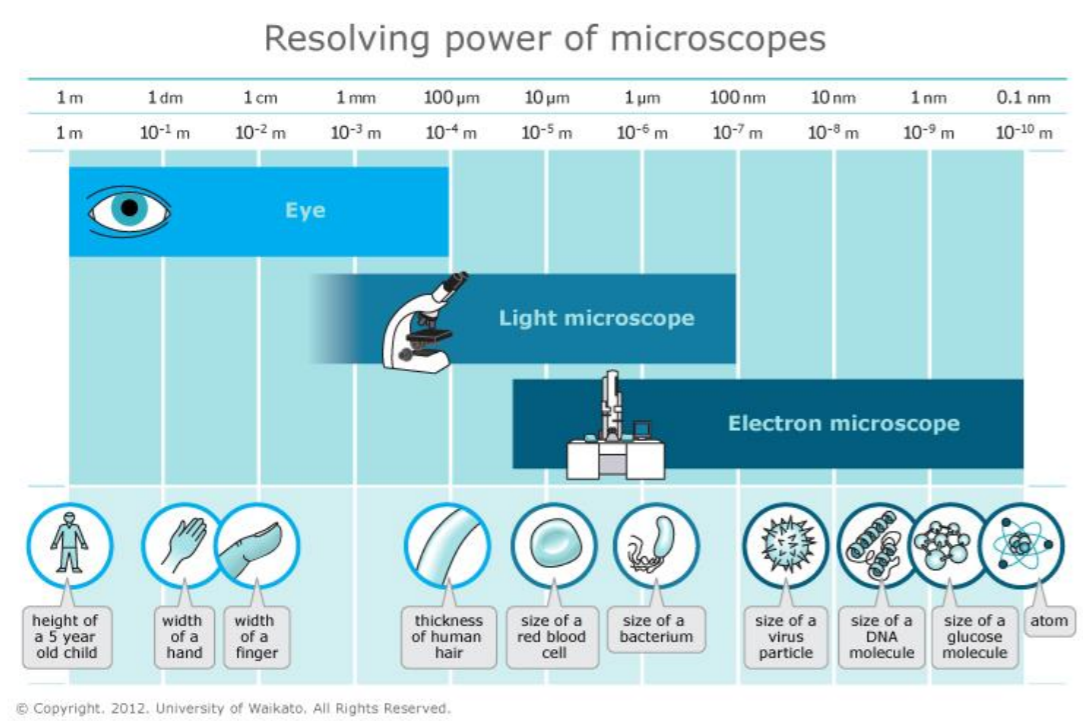
The limit of resolution of the human eye is about 0.1 mm, or 100 microns (see Table 1 for metric review). Objects that are smaller than this cannot be seen clearly without magnification. Since most cells are much smaller than 100 microns, we need to use microscopes to see them.
The limit of resolution of a standard brightfield light microscope, also called the resolving power, is ~0.2 µm, or 200 nm. Biologists typically use microscopes to view all types of cells, including plant cells, animal cells, protozoa, algae, fungi, and bacteria. The nucleus and chloroplasts of eukaryotic cells can also be seen—however smaller organelles and viruses are beyond the limit of resolution of the light microscope (see Figure 1).
Resolution is the ability of the lenses to distinguish between two adjacent objects as distinct and separate.
A compound light microscope has a maximum resolution of 0.2 µm, this means it can distinguish between two points ≥ 0.2 µm, any objects closer than 0.2um will be seen as 1 object. Shorter wavelengths of light provide greater resolution. This is why we often have a blue filter over our light source in the microscope, it helps to increase resolution since its wavelength is the shortest in the visible light spectrum. Without resolution, no matter how much the image is magnified, the amount of observable detail is fixed, and regardless of how much you increase the size of the image, no more detail can be seen. At this point, you will have reached the limit of resolution or the resolving power of the lens. This property of the lens is fixed by the design and construction of the lens. To change the resolution, a different lens is often the only answer.
| Table 1: Metric units commonly used in Microbiology |
| The basic unit of measurement of length in the metric system is the meter. |
| There are 1000 millimeters (mm) in one meter. 1 mm = 10-3 meter. |
| There are 1000 micrometers (microns, or µm) in one millimeter. 1 µm = 10-6 meter. |
| There are 1000 nanometers in one micrometer. 1 nm = 10-9 meter. |
.png?revision=1&size=bestfit&width=1021&height=680)
The microscope is one of the microbiologist's greatest tools. It allows for the visualization of small particles, including microbes, which individually are too small to be seen with the human eye. With the help of proper illumination, a microscope can magnify a specimen and optically resolve fine detail. This introduction to microscopy will include an explanation of features and adjustments of a compound brightfield light microscope, which magnifies images using a two lens system.
Before reading the following discussion of the theory of the microscope, please familiarize yourself with the names of the microscope parts shown in Figure 2 and their function.
1. Eyepiece/Ocular lens: Lens in which the final magnification occurs. Often is at 10X magnification, but can be different.
2. Revolving nose piece: Holds multiple objective lenses in place. The base of the nose piece can rotate, allowing each of the lens to be rotated into alignment with the ocular lens.
3. Objective lenses: Initial magnification of your specimen occurs here. Most brightfield light microscopes have 3 objective lenses seated into the resolving nose piece base.
4. Coarse focusing knob: larger of the two knobs, the coarse adjustment knob moves the stage up or down to bring the specimen into focus. It is very sensitive, even small partial rotation of this knob can bring about a big change in the vertical movement of the stage. ONLY use coarse focusing at the beginning with the 4X, 10X low powered objectives in place. If you use it with the higher powered objectives, it can damage the objective if you crash the lens through your glass specimen slide.
5. Fine focusing knob: smaller of the two knobs, the fine adjustment knob brings the specimen into sharp focus under low power and is used for all focusing when using high power lenses such as the 100x oil immersion lens.
6/9. Stage & Mechanical stage: The horizontal surface where you place the slide specimen is called the stage. The slide is held in place by spring loaded clips and moved around the stage by turning the geared knobs on the mechanical stage. The mechanical stage has two perpendicular scales that can be used to record the position of an object on a slide, useful to quickly relocate an object.
7. Illuminator: contains the light source, a lamp made either of an incandescent tungsten-halogen bulb or an LED. There is normally a switch to turn on/off or a rheostat located on the side that you can use to adjust the brightness of the light.
8. Diaphragm and Condenser: the diaphragm controls the amount of light passing from the illuminator through the bottom of the slide, there is a small lever used to achieve the optimal lighting. The condenser is a lens system that focuses the light coming up from the illuminator onto objects on the slide.
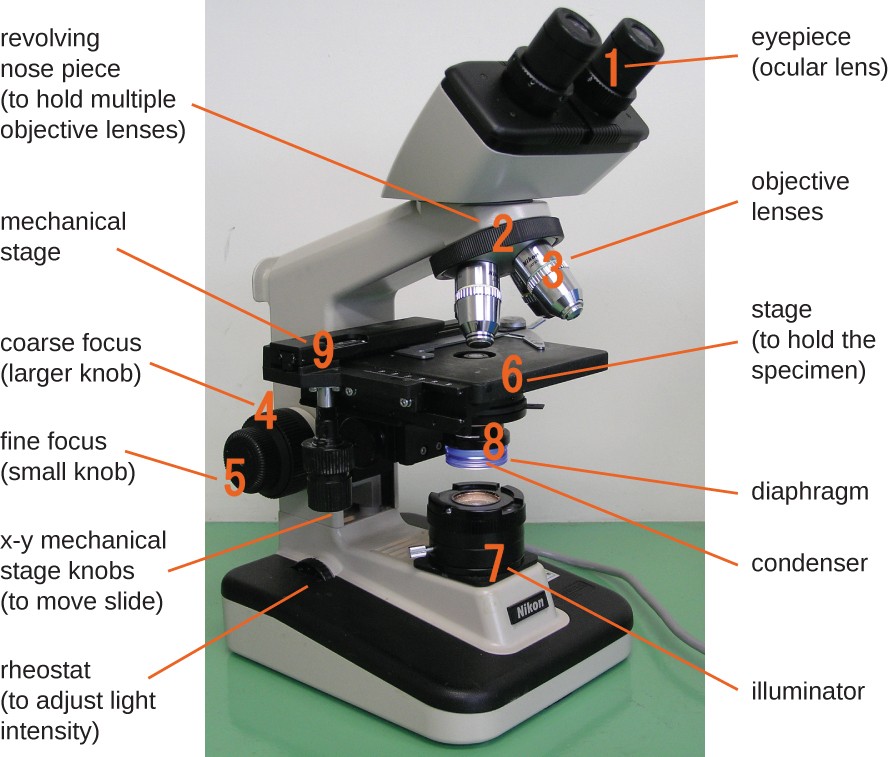
Figure 2: Brightfield light microscope used in a Microbiology lab (Lumen)
The Optical System. The optical system of a compound microscope consists of two lens systems: one found in the objective(s) lens(es) (Fig. 2, part 3); the other in the ocular (eyepiece) (Fig. 2 part 1). The objective lens system is found attached to a rotating nosepiece (Fig. 2, part 2). A microscope usually has three or four objectives that differ in their magnification and resolving power. Magnification is the apparent increase in size of an object. Resolving power is the term used to indicate the ability to distinguish two objects as separate. The most familiar example of resolving power is that of car headlights at night: at a long distance away, the headlights appear as one light; as the car approaches, the light becomes oblong, then barbell-shaped, and finally it becomes resolved into two separate lights. Both resolution and magnification are necessary in microscopy in order to give an apparently larger, finely detailed object to view.
Look at the engravings on the objective lenses and note both the magnification (for example: 10X, 40X, 100X) and the resolution given as N.A. = numerical aperture, from which the limit of resolution can be calculated:
limit of resolution = wavelength
2 X numerical aperture
At a wavelength of 550 nm (0.55µm), the 100X objective lens with a N.A. of 1.25 has a resolving power of 0.22 µm. Visible light has of wavelength from about 400-750 nanometers (nm). Since the limit of resolution decreases at the shorter wavelengths, microscopes are usually fitted with a blue filter. The resolving power of the lens separates the details of the specimen, and the magnification increases the apparent size of these details so that they are visible to the human eye. Without both resolution and magnification, you would either see nothing (good resolution, no magnification) or a big blur (poor resolution, good magnification).
The objective lens system produces an image of the specimen, which is then further magnified by the ocular lens (eyepiece). The magnification of this lens is engraved on the ocular. The total magnification of the microscope is determined by the combination of the magnification of the objective lens and ocular lens that is in use, that is:
Total magnification = objective lens X ocular lens (eyepiece)
For example, with a 10X objective lens and a 10X ocular, the total magnification of the microscope is 100X. If the objective lens is changed to a 20X objective, then the total magnification is now 200X, whereas if a 10X objective is used with a 12.5X ocular lens, the total magnification is now 125X. The use of objective and ocular lenses with different magnifications allows greater flexibility when using the compound microscope. Due to the size of most bacteria (ranges widely from ~1um to over 100um), generally we require the use of the 100x oil immersion lens with a 10x ocular lense to view bacteria in a standard brightfield light microscope.
The Illumination System. The objective and ocular lens systems can only perform well under optimal illumination conditions. To achieve these conditions, the light from the light source (bulb) must be centered on the specimen. (In most inexpensive microscopes, the manufacturer adjusts this centering. In more versatile microscopes, the centering becomes more critical and is a function performed by the operator.) The parallel light rays from the light source are focused on the specimen by the condenser lens system (see Fig. 2) The condenser can move up and down to affect this focus. Finally, the amount of light entering the condenser lens system is adjusted using the condenser diaphragm. It is critical that the amount of light be appropriate for the size of the objective lens receiving the light. This is important to give sufficient light, while minimizing glare from stray light, which could otherwise reduce image detail. The higher the magnification and resolving power of the lens, the more light is needed to view the specimen.
Objective lenses used for observing very small objects such as bacteria are almost always oil immersion lenses. With an oil immersion lens, a drop of oil is placed between the specimen and the objective lens so that the image light passes through the oil. Without the oil, light passing through the glass microscope slide and specimen would be refracted (bent) when it entered the air between the slide and the objective lens. This refracted light might still be able to contribute to the image of the specimen if the objective lens is large. However, at the higher magnification, the objective lens is small, so is unable to capture this light. The loss of this light leads to loss of image detail. Therefore, at higher magnifications, the area between the slide and the lens is modified to have the same (or nearly the same) refracting qualities (refractive index) as the glass and specimen by the addition of immersion oil. Watch this NC BioNetwork video (https://youtu.be/-0EvnroWpVc) on oil immersion. For more information, read this article (https://www.microscopeworld.com/t-us...rsion_oil.aspx).
To use an oil immersion lens, place a drop of oil on top of the dried specimen on the slide and carefully focus the microscope so that the objective lens is immersed in the oil. Any lens, which requires oil, is marked "oil" or "oil immersion." Conversely, any lens not marked "oil" should NOT be used with oil and is generally not sealed against oil seeping into and ruining the objective.
Watch this Video on how to use a Microscope, filmed at NC State Microbiology labs:
Video 1: Introduction to the Microscope (6:26)
Key Terms
microorganism, magnification, resolution, working distance, parfocal, parcentric, prokaryotic, eukaryotic, bacillus, coccus, spirillum, spirochete, morphology, bacterial arrangements, depth of field, field of view, taxonomic classification
References:
- Contributed by Joan Petersen & Susan McLaughli: Associate Professors (Biological Sciences and Geology) at Queensborough Community College
- Lumen Learning: Figure 3: Brightfield light microscope https://courses.lumenlearning.com/mi...of-microscopy/