
2.4: Lab Procedures- Prepare solid media, Aseptic Technique, T-streaking
- Page ID
- 52225

Learning outcome
- To acquaint you with the two types of culture media, Nutrient broth and Nutrient agar.
- To familiarize you with aseptic technique.
- To learn how to isolate a pure culture.
- To observe the ubiquity and diversity of microorganisms
Aseptic Technique
The average human is made up of approximately 1013 eukaryotic animal cells and 1014associated eukaryotic and prokaryotic microbial cells. This means that 90% of "your" cells are not human.
The purpose of this exercise is to familiarize you with aseptic techniques. Aseptic technique can be thought of as the manipulation of sterile instruments or culture media in such a way as to maintain sterility.
In nature, microorganisms almost always exist as mixed populations of many widely differing types. However, before most properties and characteristics of a particular organism can be determined, the organism must first be isolated in pure culture. A pure culture is one that contains a single strain of microorganism. For example, a pure culture of the bacterium Escherichia coli contains only Escherichia coli cells of a particular strain - no other living microorganisms are present. The term strain refers to a population of cells all descended from a single cell. The isolation and maintenance of pure cultures is one of the most important procedures in microbiology, and one with which all students must be familiar.
Like all other organisms, microorganisms require nutrients and a favorable environment to grow and multiply. Microbes are generally grown in a culture medium that contains essential nutrients and provides a suitable environment (e.g. proper pH). Microbes are essentially grown in a liquid medium, broth, or on a solid medium, agar.
Since most laboratory studies are made with pure cultures, it is necessary to sterilize culture media, that is, completely eliminate all living organisms. This medium must be maintained in a sterile condition, free from living organisms, until inoculated with a pure culture.
To grow a microbial culture in a sterilized medium, a number of the cells, the inoculum, are transferred, inoculated, into or onto the medium with special precautions to maintain the purity of the culture. The procedures used in the microbiology laboratory to prevent contamination of pure cultures are commonly referred to as aseptic technique.
The general rules in following aseptic technique are: 1) put nothing into sterile material that is not itself sterile, except the specific organism you are studying and, 2) do not expose sterile materials to sources of contamination, for example, laboratory air.
Following inoculation, a microbial culture is grown (incubated) in a specific environment favorable for growth. Growth of microbes is usually defined in terms of population growth, an increase in numbers of cells in the population, as opposed to cellular growth, an increase in the size of an individual cell. The resultant growth is visible as cloudiness, turbidity, in a liquid medium or as an isolated mass, colony, on a solid medium.
Materials:
Cultures
Escherichia coli (broth culture)
Serratia marcescens
mixed broth culture of Escherichia coli and Serratia marcescens
Media
one bottle sterile Nutrient agar
three tubes sterile Nutrient broth
three Nutrient agar plates, pre-dried for 2 days at room temperature
Supplies
four sterile plastic petri dishes
sterile cotton swabs
The purpose of this exercise is to familiarize you with aseptic techniques. All the procedures have been designed to minimize contamination. Observe the demonstration by your laboratory instructor and follow the procedures outlined in the manual exactly. Place the bacticinerator in front of you and put all tubes and other equipment in a suitable location that will allow you to reach them without any difficulty and without burning yourself.
At first these procedures for manipulating the loop, tubes, and caps will be difficult, but with practice these manipulations will become more rapid and less cumbersome.
Operation of the Bacticinerator:
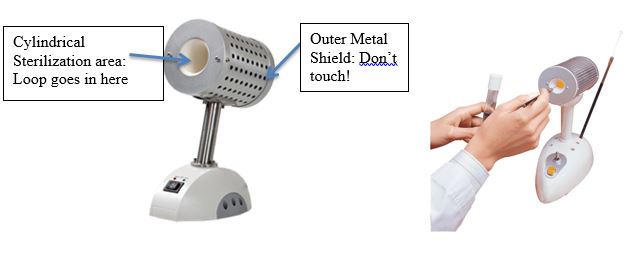
The bacticinerator is a gasless, flameless, heat sterilizer for use with inoculating loops, needles, glass tube/pipette mouths and various metal & borosilicate glass instruments. Sterilization is accomplished through infrared heat. OPERATION: Turn on the toggle switch to the “High” position; the red indicator light will come on when the switch is in the correct position. Sterilizer must be heated for 15mins prior to use. Holding the inoculating loop by the handle, gently insert inoculating loop to be sterilized into cylindrical sterilization area (see image below). Always ensure that the item is held with an insulated material. Do not directly touch the sterilized item. Do not “park” the loop in there unintended, it will MELT. Avoid scraping sides of element to ensure the longevity of the loop and heater element. Hold loop for 5 seconds. It is not necessary for loop to be glowing. The outer, metal shield of the heater element can reach temperatures as high as 400°F. Do not touch outer metal shield or introduce any flammable or volatile materials in the area surrounding the sterilizer.
Turn off bacticinerator after you have finished using it for the lab exercises for the day.
Lab Procedures:
A. Preparation of Solid Media
Solid medium is usually made by adding a solidifying agent to a broth medium. The most common solidifying agent is agar, a substance obtained from marine algae and available in dried purified form. Although different agars vary considerably in their physical properties, the usual melting point is 97-100°C. Thus, solid agar can be added to liquid culture media and melted during heat sterilization. After sterilization, this liquid media can be poured into test tubes, bottles, or petri dishes. On cooling, this medium containing agar solidifies at about 42°C. Once solidified, agar media may be incubated over the entire range of temperatures a bacteriologist is likely to use (up to 70°C, perhaps) without melting.
An agar slant results when the hot molten agar media is allowed to harden in a test tube held in a tilted position. Pouring a molten agar medium into plastic or glass Petri dishes makes agar plates.
1. Place the four sterile petri plates right side up in front of you.
The bottom of a petri plate is smaller and deeper than the top, often called the lid. Therefore, right side up is when the bottom is in contact with the bench and the larger lid covers the bottom.
2. Turn on your bacticinerator.
3. You must work quickly now to prevent the agar from solidifying before you are finished pouring the plates. Remove a bottle of melted Nutrient agar medium from the 55°C water bath. Carefully wipe the adhering water from the bottle so that, when you tip the bottle, this contaminated water will not run into the plate.
4. Loosen the cap of the bottle but do not remove it. When the cap is loosened all the way, remove it by encircling the cap with your right or left little finger and the outside edge of your palm. See Figure 1-1 a. Do not set the cap down on the bench-top.
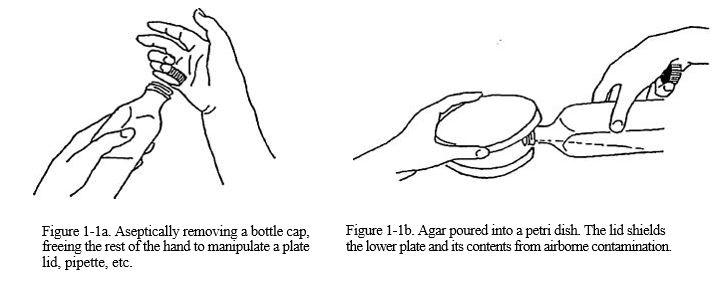
5. While still holding the cap, grasp the bottle securely with the thumb and forefinger of your right hand. See Figure 1. Lightly pass the lip of the bottle in front of the bacticinerator to burn off any adhering dust and to also to set up a negative air current. The lip of the bottle would be sterile from the autoclaving procedure.
6. Lift the lid of a petri plate with your left or right hand just enough to allow you to pour some of the agar medium into the bottom of the petri plate. See Figure 1-1b.
7. Pour enough medium into the petri plate bottom to just cover the bottom surface. (You should be able to easily pour four plates and possibly five with 100 mL of medium.)
8. Replace the lid to cover the bottom of the petri plate.
9. Carefully and slowly slide the poured plates to an undisturbed (back) portion of your bench-top to cool and solidify. Do not disturb these plates for at least 20 minutes.
10. These plates will be used in part D of this exercise.
B. Aseptic Transfers
To the microbiologist, transfer of cultures from tube to tube and from agar plates to tubes is a common and simple procedure but requires careful attention to certain details. Transfer of microorganisms is often done using a wire loop. Proper use of this inoculating loop will help insure maintenance of a pure culture.
1. Label the 3 tubes of sterile Nutrient broth. Label one "sterile control", one "broth transfer", and one "colony transfer".
2. The broth cultures of Escherichia coli and plate culture of Serratia marcescens are at the end of your bench.
3. Holding your loop like a pencil insert the loop into the cylindrical area of the bacticinerator. Heat only the wire in the sterilizer, NOT the wire holder. If done properly it should only take 5 seconds for the entire length of the wire to be sterile. Once this has occurred, remove the loop. The wire will now be sterile and very hot. Allow the loop to cool for several seconds in the air before using it. This avoids killing the cells to be transferred and splattering that can lead to the production of contaminating aerosols.
3a. Now pick up the tube containing the pure culture of Escherichia coli with your other hand, while still holding the sterile loop. With the hand holding the loop, remove the cap from the culture tube by encircling it with your little finger and the outer edge of your palm. See Figure l. DO NOT put the cap down on your bench. Lightly pass the lip of the tube in front of the bacticinerator.
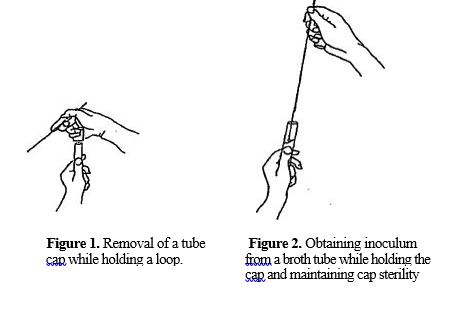
4. Now insert the loop into the E. coli broth culture and then remove it, carrying out a loopful of culture from the tube. See Figure 2. Replace the tube cap and return the tube to the storage rack.
5. Pick up and remove the cap from the tube of sterile Nutrient broth labeled "broth transfer" in the same manner as outlined in step 3a above.
6. Tilt the tube at about a 45°angle and insert the loop containing the culture into the open tube. Immerse the loop in the broth, swirl the loop gently, then remove it. Pass the tube in front of the bacticinerator and replace the cap and return the tube to the storage rack.
7. Sterilize the loop before putting it down by repeating step 3. This is necessary to avoid contaminating of the bench with the culture.
8. Now, with your other hand, lift the lid of the petri plate containing a pure culture of the Serratia marcescens. Obtain an inoculum by JUST TOUCHING ONE of the isolated single colonies on the agar surface. Do not dig into the agar. Do not scrape the loop across the surface of the plate. Replace the lid of the plate immediately.
9. Pick up and remove the cap from the tube of sterile Nutrient broth labeled "colony transfer" in the same manner as outlined in step 3a above.
10. Repeat steps 6 and 7.
11. To test your ability to properly sterilize your loop, pick a loopful of the culture from the E. coli broth culture tube following the procedures outlined in steps 3, 3a, 4. Properly sterilize the loop containing the bacterial culture, as in step 7.
12. Pick up and remove the cap from the tube of sterile Nutrient broth labeled "sterile control" in the same manner as outlined in step 3a above and insert the loop into the broth as described in step 6.
13. Repeat steps 11 and 12 a few times with the same "sterile control" tube.
C. Streak Plates
The streak plate technique is a rapid and simple method of isolating bacteria by mechanically spreading them over the agar surface of a petri plate. The purpose is to obtain well-isolated colonies, each arising from a single bacterium, so that a pure culture of each desired species in a mixture can be established. Proper streaking of plates is a relatively simple yet indispensable skill required of any microbiologist.
The basic method for the preparation of a streak plate involves the spreading of a single loopful of inoculum over the surface of the agar medium. There are many different techniques used for streaking plates. Choosing a technique is a matter of individual preference and judgment. Any method can be used as long as the objective, production of well-isolated colonies, is attained and there is no evidence of contamination. The procedure described below is commonly called a "T streak", after the marking made on the bottom of the plate.
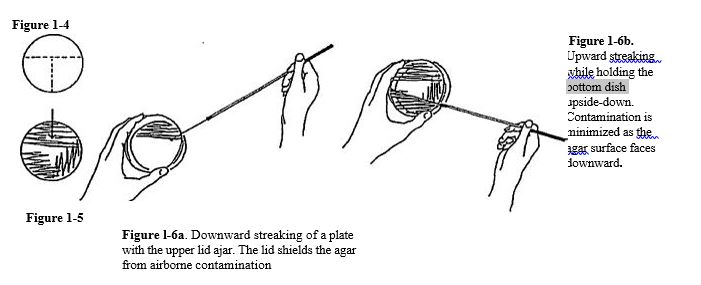
1. Draw one line, approximately one third of the way down, across the entire BOTTOM of the plate. Then draw a second line from the middle of the first through the center to the other side of the plate. This should make a large "T" on your plate, dividing it into three sectors. See Figure 1-4.
2. Label the bottom of each of the 3 prepared Nutrient agar plate with your name or initials, your lab section, and the bacterial species to be used. In addition, label one "from broth", one "from agar", and one "mixed culture".
3. Use the aseptic techniques you learned in part B. Sterilize the loop and allow it to cool.
Obtain an inoculum of bacterial cells from:
• the broth tube containing a pure culture of Escherichia coli
• the agar plate of Serratia marcescens
• the broth tube containing a mixed culture supplied by your instructor.
When obtaining samples from colonies growing on agar plates, it is ONLY necessary and is advised that the loop JUST TOUCHES THE SURFACE of ONE colony.
When obtaining samples from broth cultures, be sure to MIX the contents to ensure even distribution of microorganisms.
4. Inoculate the surface of the agar plates using the pattern shown in figure 1-5 and the technique described below.
a) deposit the inoculum by touching the loop to the surface of the plate near
the edge, in the top sector of the plate. Draw the loop lightly across the
surface of the agar for 2 cm, from the edge towards the center.
The handling of the plate can be accomplished in number of ways, all of which attempt to minimize possible contamination. Your lab instructor will demonstrate one or several possible techniques. For all of the following do not keep the agar surface of the plate unnecessarily uncovered, only expose the surface during the streaking process.
• The plate remains right side up on the bench, and the lid is lifted but kept over the plate while streaking. See figure l-6a.
• The plate is inverted and while the lid remains on the bench, the bottom is lifted and the agar surface is streaked from underneath. See figure l-6b.
Then sterilize the loop and allow it to cool in the air for a few seconds. Touch the loop to an unused edge (sterile area) of the agar surface to cool it completely before continuing.
b) Beginning at the edge of the plate near the initial inoculum deposit, make
several (10-20) parallel streaks passing through the original inoculum
deposit. Cover one-third of the plate, starting at the edge and moving
towards the center of the plate. Do this by swinging the loop holder back
and forth on the surface of the agar with very gentle and even pressure,
using only a wrist motion. The loop should almost retrace its path with
each swing as it moves down the agar surface from the edge towards the
center of the plate. Try to keep the loop, wire, and loop holder in a plane
parallel to the surface of the agar throughout the streak. Try not to lift the
loop off of the agar. Try to keep the loop in contact with the surface from
the beginning of the streak to the end. Do not dig the loop into the agar
medium,
* Sterilize the loop and allow it to cool as described above.
c) Rotate the plate 90°.
Pull the loop through one edge of the previous streaks 2 or 3 times to re-inoculate the loop. Now streak the second third of the plate with several (10-20) more parallel streaks again starting at an edge and moving towards the center of the plate. After the initial re-inoculation, avoid touching the already streaked first third of the plate.
*Sterilize the loop and allow it to cool as described above.
d) Rotate the plate 90°.
Pull the loop through one edge of the streaks in the second third of the plate to re-inoculate the loop. Now streak the last third of the plate as above, being careful to avoid the already streaked first and second thirds of the plate.
*Sterilize the loop after the last streaking.
D. Ubiquity of Microorganisms
Microorganisms are everywhere. The laboratory is populated with many different types of microbes, in the air, on the benches, on the floor, and on your clothing and body. This omnipresence of microorganisms is one reason why you have learned good aseptic techniques in parts A, B, and C of this exercise. This part of the exercise is designed to give you some idea of the kind and numbers of microbes that are present in the laboratory. There is also some freedom to allow you to satisfy your curiosity about the microorganisms all around you. Finally, you will be required to isolate one of the bacterial species you obtain from this exercise for use in the next two exercises.
1. Check to be sure the agar has solidified in your plates from part A by carefully tilting the plates and looking for movement. If the agar is solid, you may work with the plates. Label one plate on the bottom as "sterile control". Do not open this plate at any time. This is used to check if you have good aseptic technique when you poured your plates.
2. Use one plate to test for the natural contamination of articles in your environment. Label this your “test plate” and with the source “finger, cell phone, etc.” Suggested experiments include: lightly rubbing your fingers (no gloves on) over the agar surface of the plate, call this the “test plate, finger”, or opening a plate to the air for 15-20 minutes, or coughing into a plate, or gently wiping the agar surface with an object from your pocket or backpack. It is also possible to sample a surface, such as the bench-top, floor, sink, clothing, or skin. If you wish to do so, wipe the surface with sterile cotton swab then streak the entire agar surface of the plate with the swab. Use a light touch. The swabs are packaged individually and are sterile until you contaminate them with something of your choosing. Make sure the cotton tip of the swab does not come in contact with anything other than the surface you are testing. A moist swab works best for collecting samples from a dry surface. You can moisten a swab on the surface of the nutrient agar plate (at a corner), then sample the area of interest.
3. Leave the remaining two plates unlabeled and unopened on the bench, these are extra plates for the TA to collect and use for the next class.
4. Remember to label the bottom of your sample plate. Include your name or initials, your lab section, date, media type (NA for nutrient agar) and what was sampled (source).
E. Incubation
In order for microorganisms to grow they need a suitable environment. One of the most critical environmental parameters affecting growth of microorganisms is temperature. This will be discussed in lecture and is part of a later exercise. For most organisms used in this laboratory,
30°C is an acceptable temperature for growth. Constant growth temperatures are maintained by incubating microbial cultures in thermostatically controlled rooms or small ovens called incubators.
1. Incubate all tubes from part B in the 30°C incubator. Make sure labeling of your tubes is clear and complete. Place tubes in racks provided by your instructor.
2. Incubate all plates from parts C and D in the 30°C incubator. Make sure labeling of your plates is clear and complete.
Because of the high concentration of water in the agar medium, some water condensation forms in petri plates during incubation. If plates were incubated right side up, moisture would likely drip from the cover to the surface of the agar and spread out. This would disrupt individual colony formation and result in a confluent mass of growth. To avoid this, petri plates are routinely inverted (bottom-side on top) during incubation.
F. Observation
Detailed observations are the key to performing, understanding, and designing scientific experiments. A keen eye and an attention to subtle differences will help you successfully complete the laboratory report sheets. After incubation, plates and tubes should be observed for evidence of microbial growth. Record your observations on the outlined report sheets provided. These are only a guide, feel free to modify or add to them, as you deem necessary. Remember these report sheets constitute your lab notebook and are the basis for lab grades and evaluations. They should be kept up to date and brought to lab at all times.
DO NOT DISCARD YOUR SAMPLES UNTIL YOU ARE SURE OF THE RESULTS AND ARE CERTAIN THE SAMPLES ARE NOT NEEDED FOR THE NEXT EXERCISE.
Watch Video 1: Aseptic techniques Inoculating broth, slant, and stab tubes
Watch Video 1: Aseptic techniques Inoculating broth, slant, and stab tubes. URL: https://youtu.be/nMoM8Ku5-8A
Watch Video 2: How to perform a T-streak for isolated colonies.
Watch Video 2:How to perform a T-streak for isolated colonies. This video was filmed in the Microbiology laboratories at NC State. URL:https://youtu.be/NsQv7QOmdXo