
1.4: PCR and Gel Electrophoresis
- Page ID
- 73669

At the completion of this PCR lesson, learners will be able to:
- List the 5 chemical components of a PCR reaction and describe their roles.
- List the functions of the 3 temperature cycles which are repeated during a PCR reaction.
- Describe the process of observing results and interpreting results of a PCR experiment.
- List possible uses of PCR in genetic testing and in research.
Overview
The polymerase chain reaction laboratory technique is used in a variety of applications to make copies of a specific DNA sequence. This lesson describes how a PCR reaction works, what it accomplishes, and its basic requirements for success. Examples of interpreting results are given. PCR’s strengths, weaknesses, and applications to plant biotechnology are explained.
The Discovery of PCR
In 1983, Kary Mullis was driving along a Californian mountain road late one night. As a molecular biologist, Dr. Mullis was imagining a better way to study DNA. This late-night thinking led to a revolutionary way to make laboratory copies of DNA molecules (Saiki et al. 1985, Mullis 1990). In the decades since, the polymerase chain reaction or PCR, has become the standard method used for detecting specific DNA or RNA sequences. Selling the equipment and reagent kits for PCR is a multi-billion-dollar business because DNA and RNA detection is critical information in many applications.
In Vitro vs. In Vivo Replication
PCR is an In Vitro process; a series of chemical reactions that happen outside of a living cell. This laboratory technique is modeled after an In vivo process, the living cell’s natural ability to replicate DNA during normal cell cycles (see Lesson on DNA: The Genetic Material). Every living cell makes a duplicate copy of each chromosome before the cell is ready to divide. Figure 1 below illustrates the key parts of In vivo DNA replication that are the basis for PCR success.
There are other enzymes that play an important role in in vivo replication. However, PCR works as an in vitro DNA replication process by using just one of these enzymes. Mullis imagined a chemical reagent and a temperature change step in the method that could perform the work of the other two enzymes. It should be noted that because Dr. Kerry Mullis had learned about the details of in vivo DNA replication, he could create this science changing in vitro method.
Before reading the description of PCR components and processes, watching this video can help you visualize the importance of each step,
Name and Chemical Components of PCR
The name ‘Polymerase Chain Reaction’ represents the nature of the process. ‘Polymerase’ because DNA Polymerase III is required for constructing new DNA strands, just like in a living cell. ‘Chain Reaction’ describes repeating cycles of replication which target a specific segment of a chromosome and use a “copy the copies” progression each cycle that doubles the amount of DNA copies of a specific segment of DNA present each cycle. In just 20 cycles of the chain reaction, over one million (220) copies of that specific segment of DNA can be produced. This is enough DNA to see with your naked eye. The goal of PCR is to make millions of copies of a specific segment of DNA that all originate from a single DNA sample.
The five chemical components that must be added to a test tube for the PCR reaction to work, include a DNA template, DNA polymerase III enzyme, single stranded DNA primers, nucleotides, and reaction buffer.
- The DNA template is a sample of DNA that contains the target sequence of DNA for copying.
- DNA pol III. There are two requirements for a suitable DNA polymerase enzyme for PCR. First, the enzyme must have a good activity rate around 75°C. Second, the enzyme should be able to withstand temperatures of 95-100°C without denaturing and losing activity.
- Two primers. Primers are short oligonucleotides of DNA, usually around 20 base pairs in length. Because the purpose of PCR is to amplify a specific section of DNA in the genome, such as a known gene, then primers of specific sequences must be used. The geneticist planning the PCR reaction will design a forward primer to bind to one strand and a reverse primer that complements and binds to the other strand. The primer design process to select forward and reverse primers is requiring appropriate genetics thinking and is describe later in this reading.
- The four different deoxyribonucleotide triphosphates (dNTPs). Adenine (A), guanine (G), cytosine (C), and thymine (T) are needed to provide the building blocks for DNA replication. DNA polymerase will add each complementary base to the new growing DNA strand according to the original strand’s sequence following normal A-T and C-G pairings.
- Finally, a reaction buffer. This creates a stable pH and provides the Mg2+ cofactor needed for DNA pol III activity.
Three Temperature Cycles
A key insight to the success of PCR as an in vitro DNA replication process which generates millions of specific sequence copies was a three-temperature cycle which accomplish three parts of DNA replication: denaturation of the double stranded template, annealing of the primers to the single strands and extension of new strand synthesis by DNA pol III.
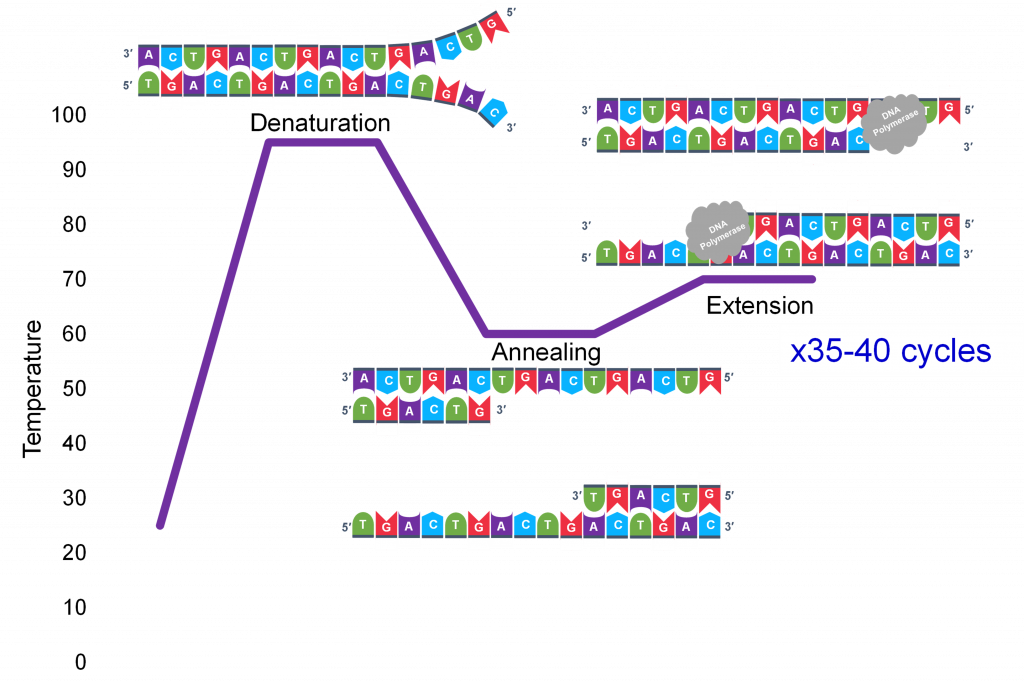
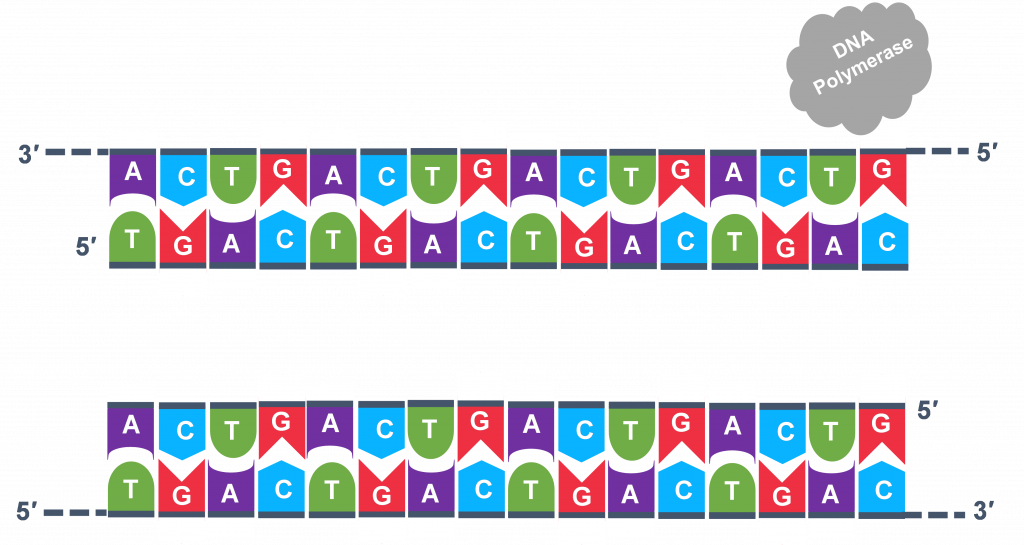
In general, a single PCR run will undergo 25-35 cycles. The first step for a single cycle is the denaturation step, in which the double-stranded DNA template molecule (Figure 2) is made single-stranded(Figure 3). The temperature for this step is typically in the range of 95-100°C, near boiling. The high heat breaks the hydrogen bonds between the strands but does not break the sugar-phosphate bonds that hold the nucleotides of a single strand together (Figure 3).

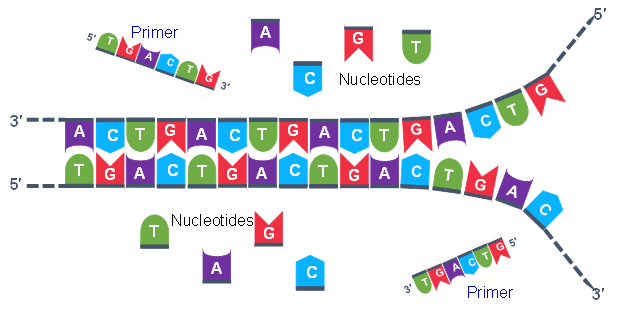
Thousands of copies of the single stranded primers and the individual nucleotides were added to the test tube prior to beginning the cycles. Both the primers and nucleotides will become part of the new DNA strands. The second step in the PCR reaction is to cool the temperature in the test tube to 45-55°C. This is the primer annealing step in which the primers bind to complementary sequences in the single-stranded DNA template. The two primers are called the forward and the reverse primer and are designed because their sequences will target the desired segment of the DNA template for replication (Figure 4).
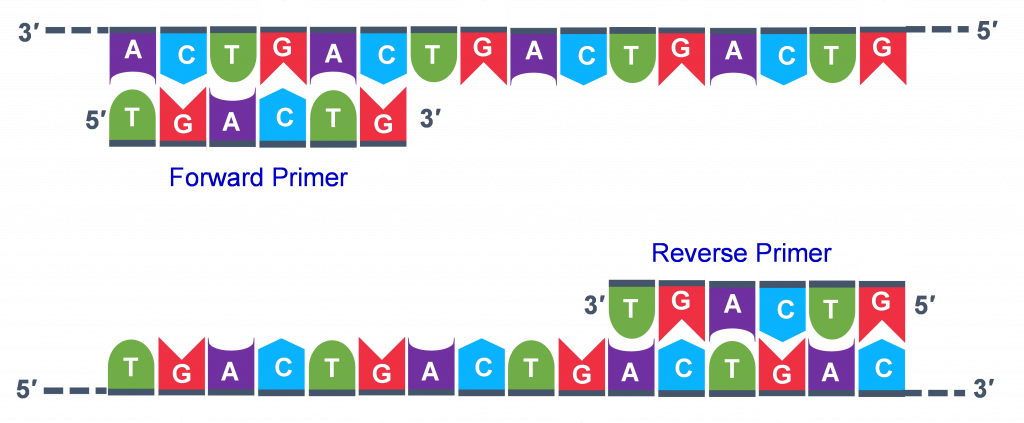
The geneticist planning the PCR analysis must “design” the forward and reverse primers and then buy them from a vendor who can synthesize single stranded DNA that has a specific sequence and length. The two most important criteria for primer design are the following.
- One primer must have a sequence that complements one of the template strands and the other primer must be complementary to the other strand. BOTH strands need to be primed for the replication process.
- The primers must bind so that their 3′ ends are ‘pointing’ in the direction of the other primer. This ensures that the sequence between the primers is replicated in the PCR cycles.
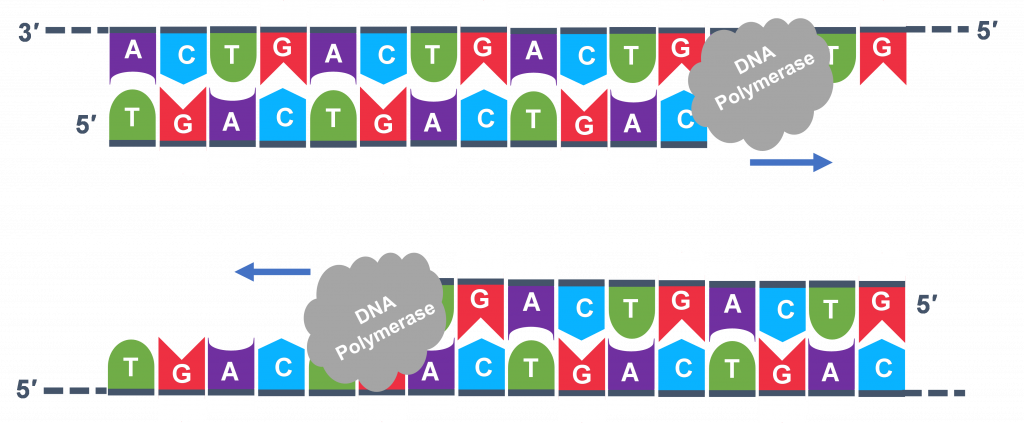
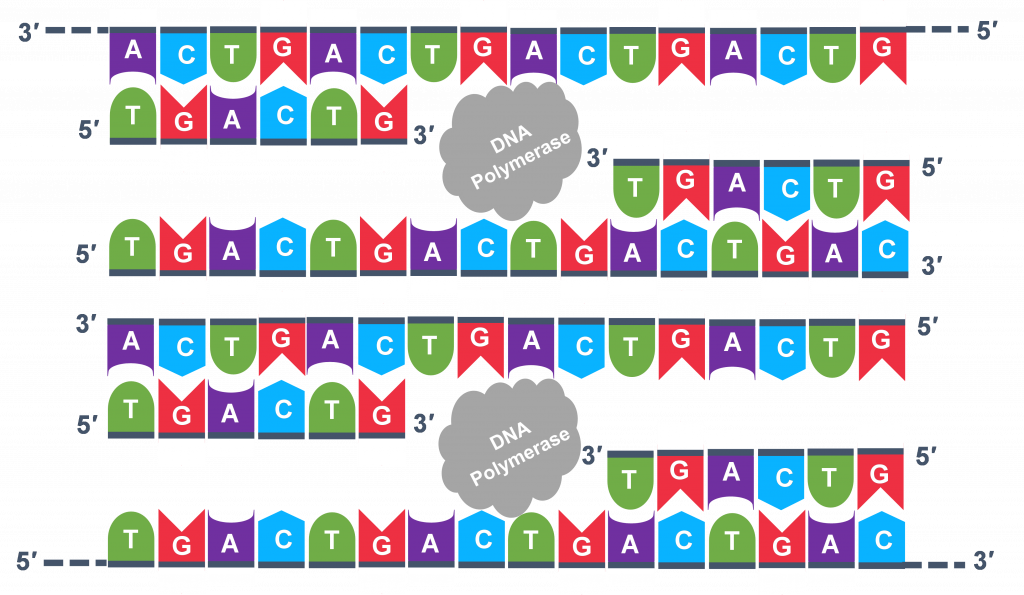
Extension: The final PCR step is when the DNA polymerase enzyme reads the template and connects new nucleotidesto the primer’s 3’ end, extending a new complementary strand of DNA (Figure 5). Completion of the final step and the first cycle of PCR, will make two double stranded DNA copies from the original template DNA, doubling of the amount of DNA present. The test tube is heated to around 75°C, optimizing DNA pol. III activity and the newly synthesizing DNA strand is extended as the template strand is read by DNA pol. III. The Extension step will run for a few minutes and this step completes one PCR cycle.
For cycle 2, the denaturation, annealing, and extension steps are repeated (Figure 6 a, b, c). This time, though there will be twice as many DNA template molecules compared to what there was at the beginning of cycle 1. Copies are being made by reading the original template and copies are made by reading the copies made in the previous cycle. Therefore, if everything is working correctly, the DNA replication in the test tube is a chain reaction where at the end of a cycle, there is double the amount of that DNA sequence as what was found at the beginning of the cycle.

Because thousands of copies of the forward and reverse primer are added at the start of PCR, all the single strand templates, both the original, the copies in cycle 3 and beyond, and the copies of the copies made from previous cycles will be primed for the extension step of the cycles.
Thermal cycler
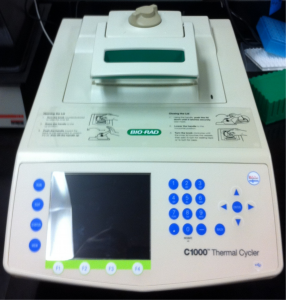
When PCR was first invented, scientists used water baths set at different temperatures and the hand transfer of test tubes at timed intervals to run the PCR reaction. Once the technique became a proven technology for DNA analysis, engineers went to work to create PCR machines. The instrument which heats and cools the DNA samples is called a thermal cycler (Figure 7). Each small tube or sample well in a plate contains all the chemical components needed for a PCR reaction. Adding a specific sample to the reaction mix provides the template DNA. A thermal cycler can be programmed for specific temperatures and the amount of time spent at each temperature. The engineered design of thermal cyclers to maximize the accurate replication of the targeted DNA in a small sample volume with the minimum amount of time can be critical in many applications of PCR.
Taq DNA polymerase
When Dr. Kerry Mullis ran the first PCR experiments, he needed to add a new sample of DNA pol III after each denaturation step. This was because the high temperature needed to denature the double stranded DNA template also denatured the DNA pol III protein structure. The DNA pol III enzyme commonly available to molecular geneticists was from E. coli bacteria and this enzyme had no stability at near boiling temperatures. Fortunately, biologists had been investigating Thermus aquaticus, (Taq) a thermophilic eubacterium found in hot springs (Chien et al. 1976). The Taq version of DNA pol III does not easily denature in the hot temperatures required in PCR; plus, it has a good efficiency, able to add 60 base pairs/sec at 70°C. Like all other DNA polymerases, Taq DNA pol III cannot begin DNA replication without the addition of a starting primer. Thus, the discovery of Taq DNA pol III and the commercial availability of this enzyme made PCR a more reliable and doable technology which hastened its application to science investigation and diagnostic testing.
Visualizing the Results with Electrophoresis
Once a PCR reaction has been completed, we need to be able to see the results. To do this, a sample of the PCR mixture is loaded into an agarose gel for electrophoresis. The agarose gel contains a matrix of pores which enables it to separate DNA fragments based on their sizes. For details about setting up and running an electrophoresis gel, see Electrophoresis: How Scientist observe fragments of DNA
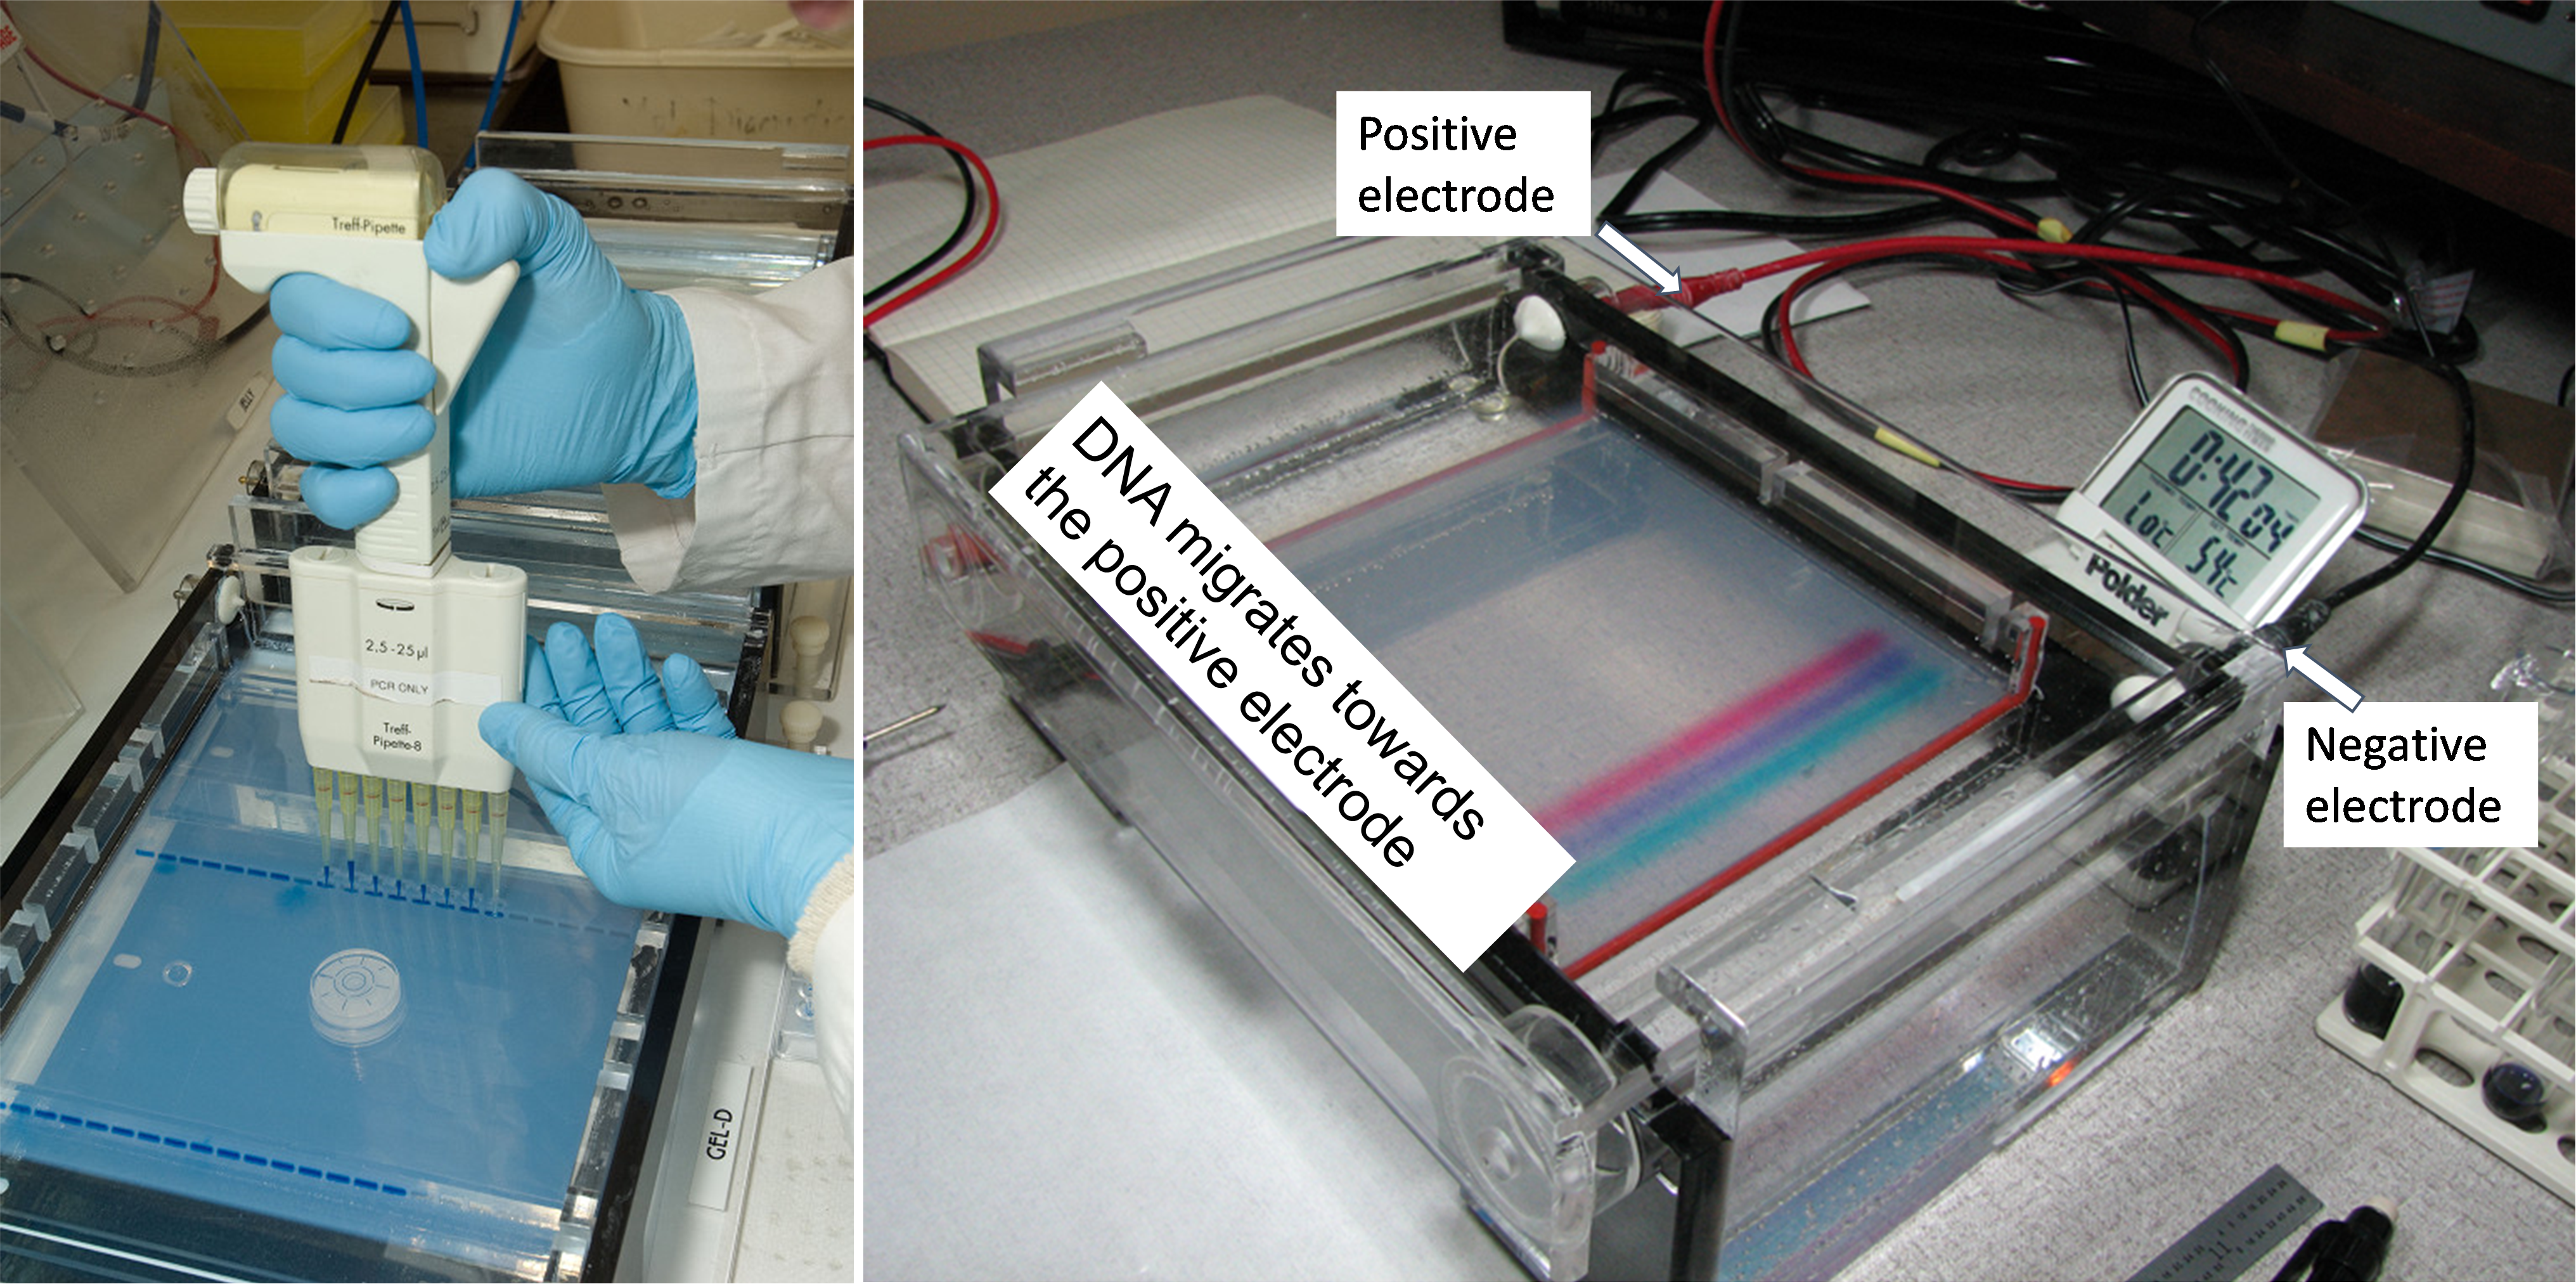
Figure 8 shows a picture of a gel electrophoresis gel that is running. The box on the right contains DNA loaded in the agarose gel. The gel placed in an aqueous solution of electrolytes. Depending on the type of dye used, color bands are a dye that was added to the PCR sample before it was loaded into the sample well. This allows for the tracking of the DNA’s progression through the gel. Hooked up to this gel unit is an electrical power source which provides the force to move the DNA through the gel. Since DNA molecules are negatively charged, they will migrate towards the red, positive electrode. Shorter DNA fragments move faster than longer fragments through the pores in the gel.
After the gel is run, the DNA is stained with a chemical that binds specifically to DNA molecules and then will either reflect a specific color of visible light or fluoresce a specific color when viewed with ultraviolet light. A single ‘band’ contains 1000s of individual DNA fragments, all of the same length. Figure 10 illustrates the visual information that can be obtained from an electrophoresis gel after it has run. The electric current uniformly moves all the DNA fragments through a gel in the same direction. The sample wells at the top of the gel image thus establish lanes for the DNA samples to move.
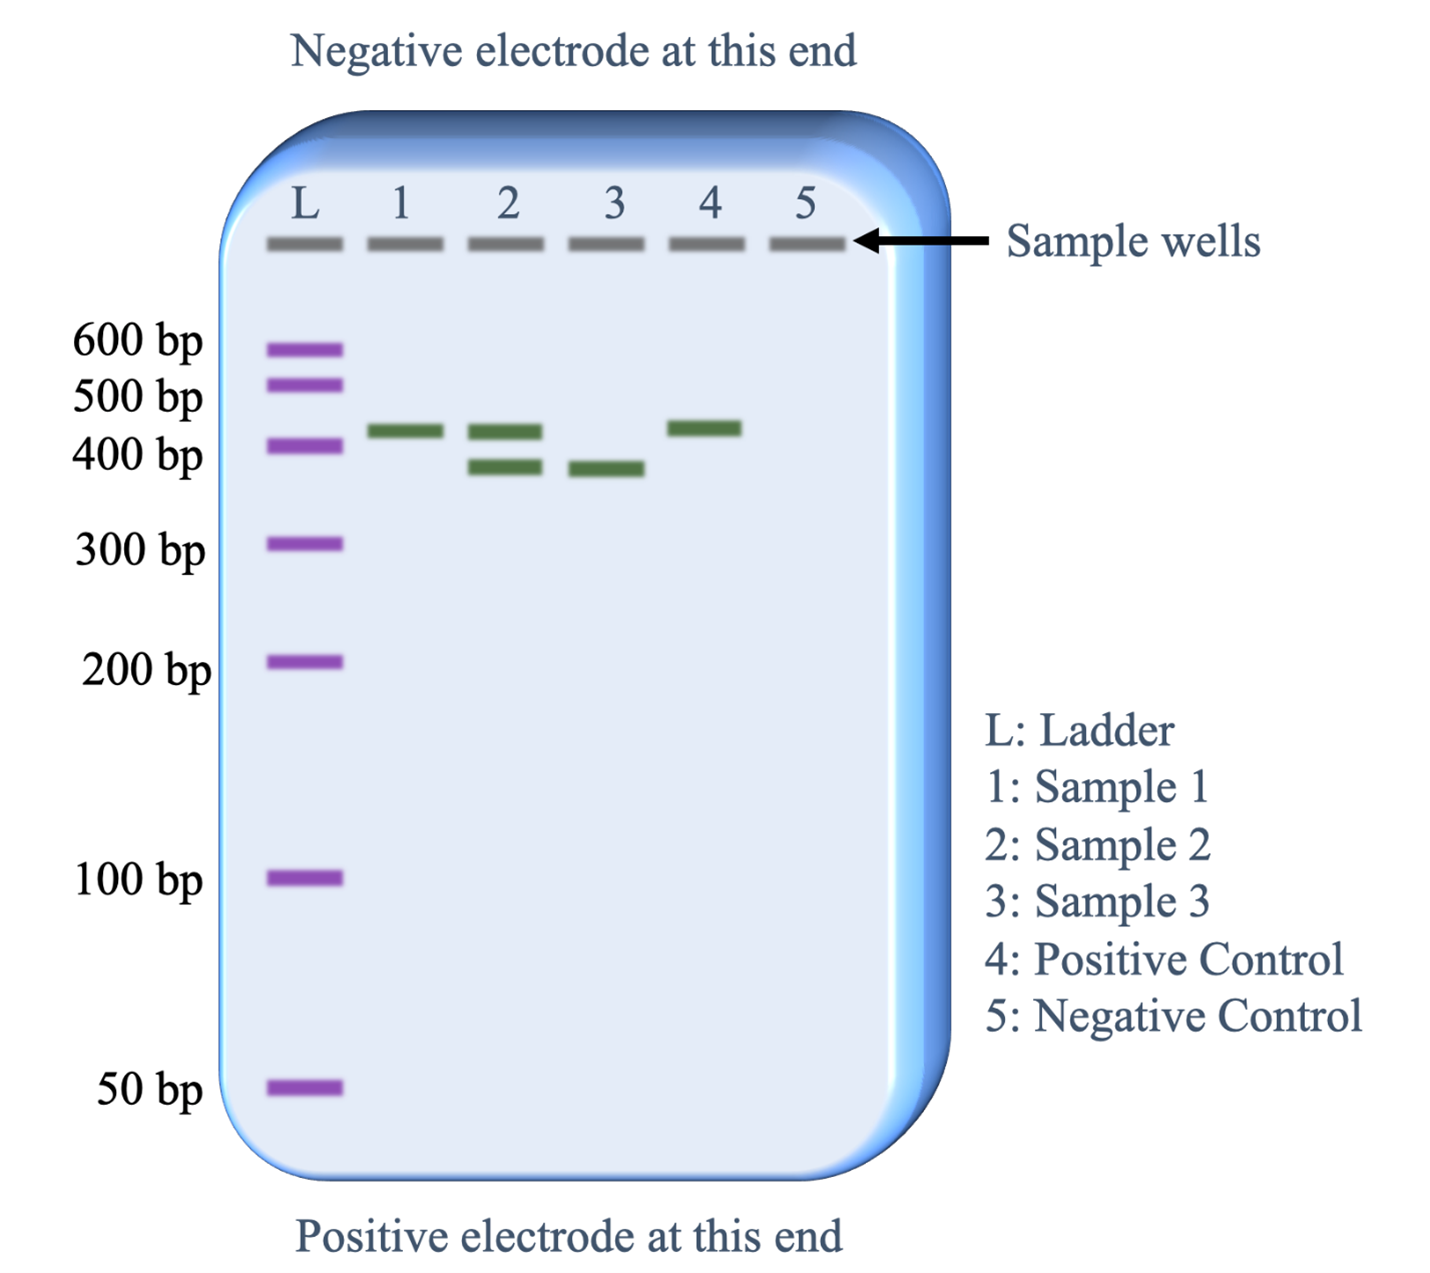
Below is a description of what information is revealed from each lane.
- Lane L: This was loaded with the DNA size ladder that contains copies of seven different lengths of DNA fragments. Commercial vendors of the DNA size ladder provide information on the lengths of each fragment in base pairs (bp). Running this lane provides an estimate of the DNA fragment lengths in the sample lanes (1-5).
- Lane 1: The PCR sample loaded in this lane has copies of a single length of DNA. The length is slightly more than 400 base pairs.
- Lane 2: The PCR sample loaded in this lane has copies of two lengths of DNA. One fragment is the same length as the fragments in lane 1 and the second fragment is slightly less than 400 bp.
- Lane 3: The PCR sample loaded in this lane has copies of one fragment that is the same length as the shorter fragments in lane 2.
- Lane 4: The positive control worked as predicted. The sample was set up with all the same reagents as the other PCR samples plus a DNA template that was known to contain the sequence targeted by the PCR primers that would generate a 410 base pair fragment.
- Lane 5: The negative control worked as predicted. The sample was set up with all the same reagents as the other PCR samples except no template DNA was added. Therefore, we would not expect the PCR reaction to work and the absence of a band of DNA fragments is as expected.
Because the positive and negative controls worked as expected, the biologist can be confident that the bands of DNA observed in lanes 1,2 and 3 reveal genetic information about the individual providing that DNA sample.
Advantages of PCR
PCR quickly became the method of choice for many types of DNA analysis because of several advantages over other DNA detection methods. The first; it is a simple procedure to set up and run. Fewer steps save time in getting a DNA analysis result. The second is the sensitivity. A very small amount of template DNA in the sample can be detected. Even just a few skin cells from one human hair contain enough DNA, making PCR useful in forensics. The third is that it can be designed to accurately differentiate genetic samples that are different by as little as single nucleotide in the targeted sequence. Finally, in application where large numbers of samples need to be subjected to the same PCR analysis, automation and robotic assistance allow the processing of many samples in a very short time. For example, an automated PCR would be critical for testing large numbers of people in hours during a pandemic.
Limitations of PCR
There are some drawbacks of using PCR that one should be aware of as well. First, the sequence of the gene or chromosome region being targeted is required. This limitation is rapidly diminishing as gene and genome sequencing technology and sharing of this sequence through Internet data bases has emerged as the norm in genetic analysis. Because of the size of the genomes of living things and a high conservation of gene sequences in many organisms, primers designed for a PCR test must be empirically tested with the proper controls. Biologists can easily generate false positive DNA from PCR that is caused by contamination or lack of specificity in primer design. There may also be a need to optimize concentrations of each chemical component. For example, changing the amount of DNA template, MgCl2 and Taq polymerase can affect both the quantity and quality of bands produced. Some studies have shown that even the brand of Taq polymerase can affect results (Holden et al. 2003). Likewise, the temperature cycles may need to be fine-tuned for a specific PCR test. Finally, as an in vitro DNA replication method, PCR cannot replicate entire chromosomes.
To briefly highlight the topics of this lesson, remember that PCR is a relatively easy lab technique which amplifies the amount of DNA present, much like living cells do in the beginning stages of a cell cycle. There are 5 chemical components of a PCR reaction: a DNA template, a DNA polymerase, primers, nucleotides, and a buffer. The 3 temperature steps for one cycle are the denaturation, primer annealing and extension steps. There are now many variations and uses of PCR ranging from forensics to genomic studies to identifying transgenic crops.
Watch these videos to learn more about PCR: