15.5: Exercise 1 - Preparing the membrane replica
- Page ID
- 17591
\( \newcommand{\vecs}[1]{\overset { \scriptstyle \rightharpoonup} {\mathbf{#1}} } \)
\( \newcommand{\vecd}[1]{\overset{-\!-\!\rightharpoonup}{\vphantom{a}\smash {#1}}} \)
\( \newcommand{\id}{\mathrm{id}}\) \( \newcommand{\Span}{\mathrm{span}}\)
( \newcommand{\kernel}{\mathrm{null}\,}\) \( \newcommand{\range}{\mathrm{range}\,}\)
\( \newcommand{\RealPart}{\mathrm{Re}}\) \( \newcommand{\ImaginaryPart}{\mathrm{Im}}\)
\( \newcommand{\Argument}{\mathrm{Arg}}\) \( \newcommand{\norm}[1]{\| #1 \|}\)
\( \newcommand{\inner}[2]{\langle #1, #2 \rangle}\)
\( \newcommand{\Span}{\mathrm{span}}\)
\( \newcommand{\id}{\mathrm{id}}\)
\( \newcommand{\Span}{\mathrm{span}}\)
\( \newcommand{\kernel}{\mathrm{null}\,}\)
\( \newcommand{\range}{\mathrm{range}\,}\)
\( \newcommand{\RealPart}{\mathrm{Re}}\)
\( \newcommand{\ImaginaryPart}{\mathrm{Im}}\)
\( \newcommand{\Argument}{\mathrm{Arg}}\)
\( \newcommand{\norm}[1]{\| #1 \|}\)
\( \newcommand{\inner}[2]{\langle #1, #2 \rangle}\)
\( \newcommand{\Span}{\mathrm{span}}\) \( \newcommand{\AA}{\unicode[.8,0]{x212B}}\)
\( \newcommand{\vectorA}[1]{\vec{#1}} % arrow\)
\( \newcommand{\vectorAt}[1]{\vec{\text{#1}}} % arrow\)
\( \newcommand{\vectorB}[1]{\overset { \scriptstyle \rightharpoonup} {\mathbf{#1}} } \)
\( \newcommand{\vectorC}[1]{\textbf{#1}} \)
\( \newcommand{\vectorD}[1]{\overrightarrow{#1}} \)
\( \newcommand{\vectorDt}[1]{\overrightarrow{\text{#1}}} \)
\( \newcommand{\vectE}[1]{\overset{-\!-\!\rightharpoonup}{\vphantom{a}\smash{\mathbf {#1}}}} \)
\( \newcommand{\vecs}[1]{\overset { \scriptstyle \rightharpoonup} {\mathbf{#1}} } \)
\( \newcommand{\vecd}[1]{\overset{-\!-\!\rightharpoonup}{\vphantom{a}\smash {#1}}} \)
\(\newcommand{\avec}{\mathbf a}\) \(\newcommand{\bvec}{\mathbf b}\) \(\newcommand{\cvec}{\mathbf c}\) \(\newcommand{\dvec}{\mathbf d}\) \(\newcommand{\dtil}{\widetilde{\mathbf d}}\) \(\newcommand{\evec}{\mathbf e}\) \(\newcommand{\fvec}{\mathbf f}\) \(\newcommand{\nvec}{\mathbf n}\) \(\newcommand{\pvec}{\mathbf p}\) \(\newcommand{\qvec}{\mathbf q}\) \(\newcommand{\svec}{\mathbf s}\) \(\newcommand{\tvec}{\mathbf t}\) \(\newcommand{\uvec}{\mathbf u}\) \(\newcommand{\vvec}{\mathbf v}\) \(\newcommand{\wvec}{\mathbf w}\) \(\newcommand{\xvec}{\mathbf x}\) \(\newcommand{\yvec}{\mathbf y}\) \(\newcommand{\zvec}{\mathbf z}\) \(\newcommand{\rvec}{\mathbf r}\) \(\newcommand{\mvec}{\mathbf m}\) \(\newcommand{\zerovec}{\mathbf 0}\) \(\newcommand{\onevec}{\mathbf 1}\) \(\newcommand{\real}{\mathbb R}\) \(\newcommand{\twovec}[2]{\left[\begin{array}{r}#1 \\ #2 \end{array}\right]}\) \(\newcommand{\ctwovec}[2]{\left[\begin{array}{c}#1 \\ #2 \end{array}\right]}\) \(\newcommand{\threevec}[3]{\left[\begin{array}{r}#1 \\ #2 \\ #3 \end{array}\right]}\) \(\newcommand{\cthreevec}[3]{\left[\begin{array}{c}#1 \\ #2 \\ #3 \end{array}\right]}\) \(\newcommand{\fourvec}[4]{\left[\begin{array}{r}#1 \\ #2 \\ #3 \\ #4 \end{array}\right]}\) \(\newcommand{\cfourvec}[4]{\left[\begin{array}{c}#1 \\ #2 \\ #3 \\ #4 \end{array}\right]}\) \(\newcommand{\fivevec}[5]{\left[\begin{array}{r}#1 \\ #2 \\ #3 \\ #4 \\ #5 \\ \end{array}\right]}\) \(\newcommand{\cfivevec}[5]{\left[\begin{array}{c}#1 \\ #2 \\ #3 \\ #4 \\ #5 \\ \end{array}\right]}\) \(\newcommand{\mattwo}[4]{\left[\begin{array}{rr}#1 \amp #2 \\ #3 \amp #4 \\ \end{array}\right]}\) \(\newcommand{\laspan}[1]{\text{Span}\{#1\}}\) \(\newcommand{\bcal}{\cal B}\) \(\newcommand{\ccal}{\cal C}\) \(\newcommand{\scal}{\cal S}\) \(\newcommand{\wcal}{\cal W}\) \(\newcommand{\ecal}{\cal E}\) \(\newcommand{\coords}[2]{\left\{#1\right\}_{#2}}\) \(\newcommand{\gray}[1]{\color{gray}{#1}}\) \(\newcommand{\lgray}[1]{\color{lightgray}{#1}}\) \(\newcommand{\rank}{\operatorname{rank}}\) \(\newcommand{\row}{\text{Row}}\) \(\newcommand{\col}{\text{Col}}\) \(\renewcommand{\row}{\text{Row}}\) \(\newcommand{\nul}{\text{Nul}}\) \(\newcommand{\var}{\text{Var}}\) \(\newcommand{\corr}{\text{corr}}\) \(\newcommand{\len}[1]{\left|#1\right|}\) \(\newcommand{\bbar}{\overline{\bvec}}\) \(\newcommand{\bhat}{\widehat{\bvec}}\) \(\newcommand{\bperp}{\bvec^\perp}\) \(\newcommand{\xhat}{\widehat{\xvec}}\) \(\newcommand{\vhat}{\widehat{\vvec}}\) \(\newcommand{\uhat}{\widehat{\uvec}}\) \(\newcommand{\what}{\widehat{\wvec}}\) \(\newcommand{\Sighat}{\widehat{\Sigma}}\) \(\newcommand{\lt}{<}\) \(\newcommand{\gt}{>}\) \(\newcommand{\amp}{&}\) \(\definecolor{fillinmathshade}{gray}{0.9}\)Separate proteins on an SDS-PAGE gel
1. Separate the proteins that will be analyzed on western blots by SDS-PAGE.
- Remove the electrode apparatus and holder from the tank, and remove the gel from the holder. Do not remove the gel from the plates until you are ready to assemble the transfer cassette (see below).
- Dispose of the remaining buffer down the sink. Rinse out the buffer tank with deioinized water to remove residual SDS, which can interfere with the transfer process.
Prepare the transfer membrane
NOTE: DO NOT touch transfer membranes with your fingers. Wear gloves and use filter forceps when you handle transfer membranes.
1. Gather the PVDF membrane and two pieces of thick filter paper, such as Whatman 3MMTM. The PVDF membrane and filter papers should be cut to a size that is slightly larger than the SDS-PAGE gel. You will also need a transfer cassette and two fiber pads.
- Prepare the PVDF membrane. Using pencil, place an orientation mark in a corner of the PVDF membrane for later identification. Wet the membrane by placing it in a small tray containing methanol for ~30-60 seconds with gentle agitation.
- Dispose of the methanol in the waste container and add deionized water to the tray. Gently agitate for ~1 minute.
- Replace the deioinized water with transfer buffer. Store the membrane in transfer buffer until you are ready to start the transfer.
Assemble the transfer cassette
1. Using a spatula or a green plastic wedge, remove the small glass plate from the gel. The gel will remain attached to the large glass plate. With a spatula, remove the lower right corner of the gel to serve as an orientation mark. (This correponds to the first lane of your gel.)
2. Assemble the transfer cassette as shown below. Be sure that all parts of the transfer “sandwich” remain moist at all times.
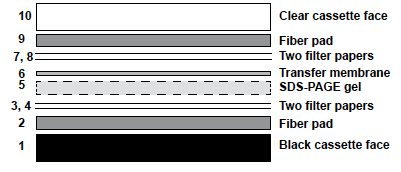
- Place a wet fiber pad (2) on top of the black cassette face (1).
- Add two pieces of filter paper (3,4).
- Position the gel (5) on top of the filter paper while it is still attached to the glass plate. Use a spatula to carefully release the gel from the plate. You may find it easier to remove the gel by beginning at the bottom edge near the dye front.
- Place the PVDF membrane (6) on top of the gel. Orient the gel so that the pencil mark on the membrane corresponds to the clipped corner of the gel. Be sure that there are NO air bubbles between the gel and the membrane.
- Add the remaining filter papers (7,8) and the fiber pad (9).
- Fold the clear cassette face (10) over the gel assembly and carefully slide the clamp into place.
Electrophoretic protein transfer
- Place the transfer sandwich into the cassette holder with the black face of the transfer cassette aligned with black side of the cassette holder and the clear face aligned with red side of the cassette holder (right). NOTE: Each cassette holder can hold two transfer cassettes.
- Place the cassette holder and assembled cassettes into the electrophoresis tank. Add an ice pack to the tank.
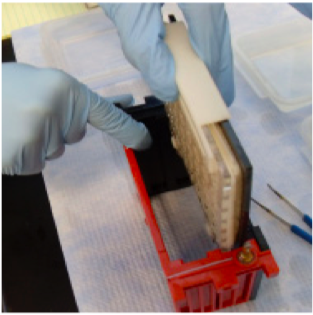
- Fill the electrophoresis tank to the top with transfer buffer.
- Place lid on tank by aligning black with black and red with red.
- Transfer proteins at 100 V for 1 hour at room temperature or at 20 V overnight in the cold room. If you are transferring overnight, be sure to label the tank clearly and to coordinate the following day’s activities with others sharing the tank with you.
- When the transfer is complete, remove the transfer cassette from the tank. Pour the transfer buffer back into its original bottle so that it can be reused.
- Disassemble the transfer cassette. Depending on your schedule:
- If you will be continuing with the western procedure, skip the rehydration step (step 1) below and continue with the blocking step (step 2). Be careful that the membrane remains moist!
- If you will be processing the membrane at a later time, allow the membrane to dry out. Wrap the membrane in plastic wrap and save it for a later lab period.